Boring & Honing Instructions
- Adherence to proper boring and honing procedure is essential to overall ring performance. To ensure that the bore finish will retain an oil film, it is vital that the guidelines listed below are followed for cast iron bores.
- Install and torque main bearing caps
- Use torque plates. This simulates the distortion that occurs when the cylinder head is mounted to the block. (hint: After boring and honing, leave the torque plates in place and fit/gap the piston rings to their respective cylinders.)
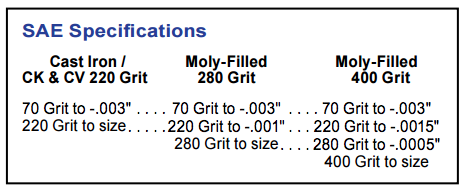
- Allow for a minimum of .003″ excess material for use as honing stock
- Intermediate hone to within .0005″ of finished size with #220-#280 grit stones. (With diamond stones use #280-#400 grit.)
- Finish hone with #400 grit stone or higher. (Use #600 grit diamond stone. If using hand operated equipment, set drill speed between 200-450 rpm.)
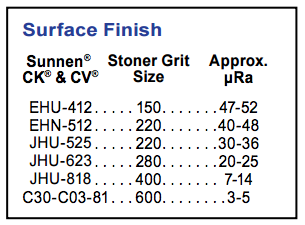
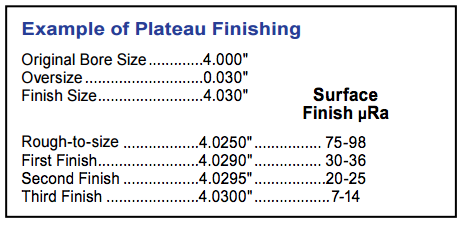
- Finish with an appropriate stone or tool to achieve desired plateau finish (see below).
Why a Plateau Finish?
Plateau honing is the popular name for the process that replicates the cylinder bore surface finish normally produced by the rings after they have worn down the surface peaks during “break in”. This technique produces flat areas or plateaus (Rk) on the cylinder wall after finish honing by using a very fine grit stone or a PHT type brush tool to remove the peaks (Rpk) from the surface. This lowers the overall roughness average (Ra) while maintaining valley depth (Rvk) in the cross-hatch pattern of the cylinder wall. A high Rvk value is very desirable for oil retention qualities and will substantially reduce “break in” time and increase ring life.
Ra (Roughness Average) = Used to describe surface roughness as an average between the peaks and valleys that exist in a finish over a specified area, usually micro inches.
Rpk (Peaks) = Average peak height.
Rvk (Valleys) = Average valley depth.
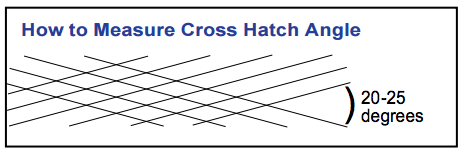
Cross Hatch = The pattern of intersecting parallel lines left after finish honing operations are completed. The smaller the intersecting angle, the larger the area (Rk) between the hone marks.
Cross Hatch Pattern
Maintaining the proper cross hatch angle is important for two reasons;
- Oil retention on the cylinder wall and
- The rate of ring rotation. Excessively shallow cross hatch angles can hinder or slow down the necessary ring rotation that allows dissipation of heat. It can also leave too much oil on the cylinder wall allowing the rings to skate over the surface leading to excess oil consumption. Too steep of a cross hatch angle may not provide adequate oil retention and can result in dry starts and premature ring wear. A steep pattern angle can also create excessive ring rotation that will accelerate ring and piston ring groove wear.


